Building Workflow Driven .NET Core Applications with Elsa

This article is about Elsa 1. If you want to learn how to build workflow driven .NET applications with Elsa 2, please checkout this series instead.
For many years, I’ve been developing .NET applications using Orchard, an extensible, modular, open source application framework and CMS built with Classic ASP.NET MVC back in the days, and now redeveloped for ASP.NET Core.
One if its most awesome features is Workflows. I’ve used Orchard 1 workflows to implement user registration, authentication and content approval workflows. Being able to create, configure and modify complex, long-running business processes is a powerful feat in many an app, and the Orchard Workflow module makes this sort of thing child’s play.
I often found myself wishing that I could use it in other ASP.NET Core applications as well. However, these applications were not Orchard Core powered applications, nor did the simple desire to use workflows warrant taking a dependency on Orchard Core Framework.
Ultimately, I decided it was about time to take Orchard Core’s workflow engine and philosophies, and turn it into a reusable, .NET Standard library, enabling *any* .NET application to enjoy the power of workflow.
Meet Elsa, an open source suite of .NET Standard libraries and tools that enable developers to implement long-running workflows. The core philosophy of Elsa is to be able to connect small executable units with one another, allowing you to orchestrate real business processes such as document approval, customer on-boarding and order fulfillment processes.
As should be clear by now, Elsa is inspired on Orchard Core Workflows. But I also took inspiration from a number of other existing workflow solutions, such as Windows Workflow Foundation and Azure Logic Apps, and I continue to be inspired by libraries such as Workflow Core and Workflow Engine.
Elsa can be used to implement a workflow engine within your own application’s process, or as an external workflow service with which your applications interact with. Furthermore, workflows can be implemented as strongly typed classes, as JSON/YAML files, or visually using a HTML5 web-based designer.
To illustrate its potential, Let’s walk through a simple scenario: User signup.
The remainder of this post is a walkthrough of setting up a Blazor application, integrating it with workflow services and then creating and running a workflow. If it’s too long to read, you can skip ahead and download the final solution and play around with the workflow editor. Make sure to import the accompanying workflow json file that you can import from the workflow editor view.
Scenario: User Signup
In this scenario, we have a web application where users can register an account. Upon registration, we want the system to assign a user role to the account and send an email containing an activation link.
If the user doesn’t activate their account within a specified amount of time, a reminder is sent per email to activate quickly.
If the user clicks the activation link, their account becomes activated and all will be well. However, if the user does not activate their account in time, their account will be removed.
The final workflow will look like this:

Getting it done
The above scenario should serve well to demonstrate some of Elsa’s key functionalities.
It will show how to:
- Implement business logic visually.
- Invoke workflows from application code.
- Implement long-running workflows (the workflow becomes suspended and persisted until the registration process times out or the user activates their account).
- Implement domain-specific activities.
- Setup the Elsa Dashboard and how to design and manage workflows.
We’ll first create basic ASP.NET Core application with a Login screen. We’ll then implement the Login behavior using a workflow, which itself requires a few custom activities that we will build:
- CreateUser
- AssignRole
- ActivateUser
- RemoveUser
We’ll also use other activities that are provided by the Elsa packages.
Let’s begin!
Scaffolding the Application
I’ll walk you through the main steps to scaffold and implement the sample application next.
The application is a simple Blazor Server-side app that displays a simple registration form. First, we’ll clean up the UI a bit. After that we’ll get to the real deal and see how to implement the workflow bits.
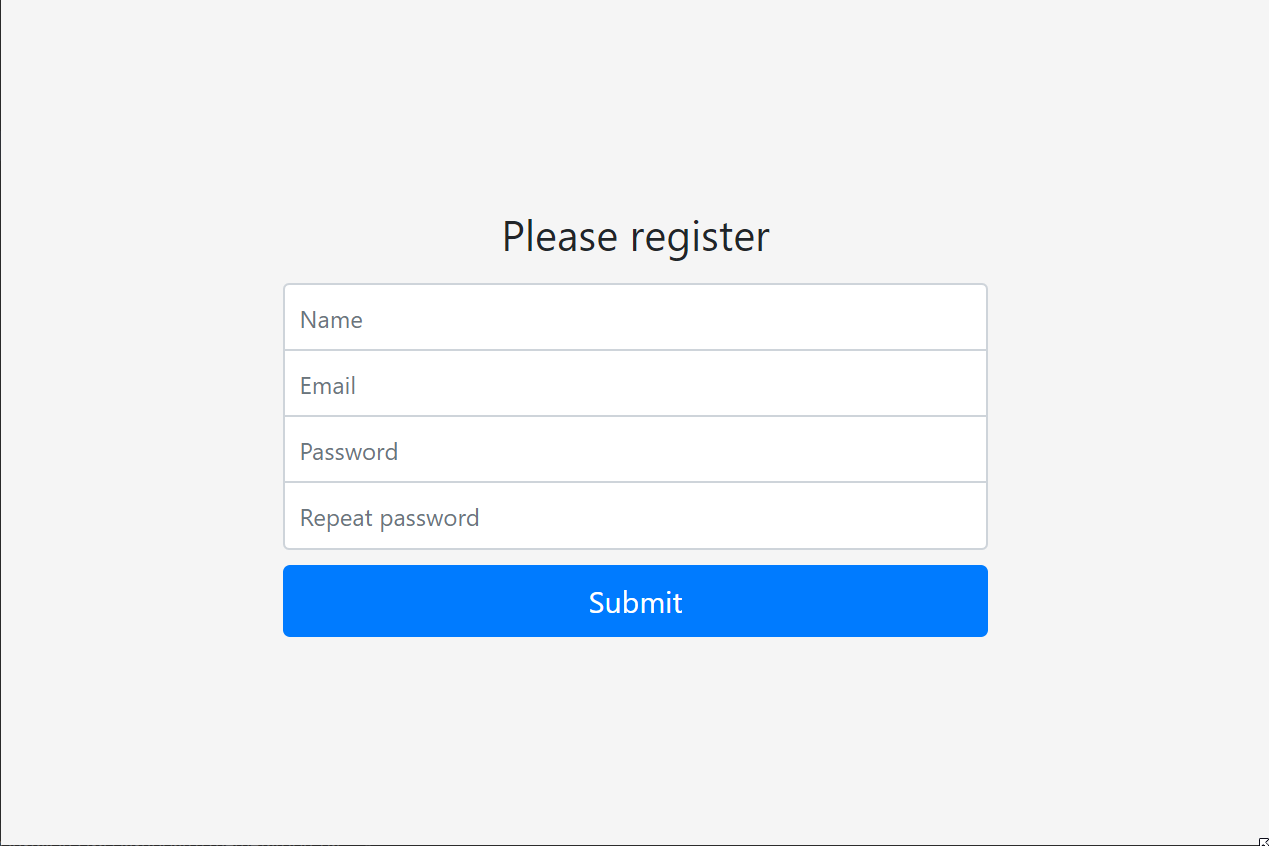
When the user submits the form, a workflow will be invoked that implements the scenario as described above.
1. File New Project
Create a new, empty ASP.NET Core Server Side Blazor application called Elsa.Samples.UserRegistration.Web. We could have gone with a regular MVC or Razor Pages application as well, or even a simple Console application. The UI stack doesn’t matter.
2. Add Packages
Once the solution is created, add the following packages to the web project:
- Elsa
- Elsa.Dashboard
- Elsa.Persistence.MongoDb
3. RegistrationModel
In order to receive the form submission values, we’ll create a view model class called RegistrationModel that we will use to bind against the form.
Create a new folder called Models and create the following class:
4. Update the UI
Next, we’ll update a few files to clean up the UI a bit.
First, update the MainLayout.razor file with the following contents:
And let’s update Index.razor with the following:
Finally, replace the contents of the site.css file (in wwwroot/css) with the following CSS:
When you now launch the site, you should see a basic registration form that does nothing when it’s submitted.
Let’s change that next.
Adding Elsa and Domain services
Before we can start creating the workflow, we first need to configure some services and create a few domain-specific activities.
Speaking of the domain, we also need to create a User class that represents the user being registered, and a service that will hash the provided user’s password. We also need to be able to store the user.
Once we have our domain models and services in place, we need a set of activities that we can use in the workflow.
We’ll find more things we need to do along the way, but let’s start with Startup.
1. Update Startup
The following gist contains the complete Startup file that we need. Don’t worry about the references to types and methods that don’t yet exist: we’ll implement each one of them next.
2. Update appsettings.json
Notice that various references are made to the Configuration property. Let’s update appsettings.json next:
The most interesting parts are the ConnectionStrings and Elsa sections.
About ConnectionStrings:MongoDb
As mentioned, we’re using MongoDB in this tutorial. If you don’t have MongoDB installed, you can choose to run it in a container (assuming you have Docker Desktop installed). I’ll include a docker compose file to make this easy:
docker-compose.yaml:
version: '3.7'

services:
  mongodb:
    image: mongo
    ports:
    - "27017:27017"
To run it, do:
docker-compose upMake sure you have docker-compose installed in order to run this.
If you’re looking for a proper MongoDB client, I recommend Robo 3T, a simple to use, free MongodB client. Studio 3T has more features, but is a commercial product.
About Elsa:Http:BaseUrl
In case you’re wondering about line 15, the reason we are configuring the base URL of the application is to allow Elsa HTTP services to generate absolute URLs from non-HTTP contexts. For example, if the workflow executes from a background thread (in response to a timer event for instance), there will be no HTTP context available to infer absolute URLs.
About Elsa:Smtp
Regarding the Elsa:Smtp section, you’re free to use whatever SMTP host you like. For development purposes, I like to use Smtp4Dev, a nifty SMTP proxy that simply records outgoing SMTP messages for you to inspect, without actually delivering these messages. This has 3 major advantages:
- No need to use existing email addresses.
- No need to worry about accidentally sending emails to real recipients.
- Convenient way to inspect sent messages.
As you can see, I configured the port to be 2525, so make sure your SMTP host listens to that port as well (or update appsettings.json to match your SMTP host configuration).
About Elsa:Timers:SweepInterval
Regarding line 22, this setting controls the interval the Elsa background service uses to “sweep” workflows. In this case, we configured the interval to be every 10 seconds. The format is that of NodaTime’s Period.
3. Create the User class
Add the following class to the Models folder:
namespace Elsa.Samples.UserRegistration.Web.Models
{
    public class User
    {
        public string Id { get; set; }
        public string Name { get; set; }
        public string Email { get; set; }
        public string Password { get; set; }
        public string PasswordSalt { get; set; }
        public bool IsActive { get; set; }
    }
}
4. Create the PasswordHasher service and HashedPassword model
Because we’re asking the user to provide a password to associate with their account, we better not store that password as clear text. Instead, we need to store a hash of that password. That’s where IPasswordHasher comes in.
Create a new folder called Services, and add the following interface:
Then add the following implementation class:
The two methods allow us to generate a hashed password with and without providing a salt. When we don’t provide a salt, one is generated and returned as part of the HashedPassword object. We store the hashed password as well as the generated salt used for the hash, which we then later use to hash and salt the password the user provides during login.
Add the HashedPassword class to the Models folder:
5. LiquidConfigurationHandler
What’s that now? Elsa supports a thing called workflow expressions. One of the supported syntaxes is JavaScript. The other is Liquid. Liquid is a very convenient templating syntax that we can use in our activities for those properties that support workflow expressions. But in order to be able to access custom models such as User and RegistrationModel, we need to whitelist these models. That’s where the LiquidConfigurationHandler comes in.
Create a new folder called Handlers and add the following class:
Elsa’s Liquid evaluator uses Fluid, an open source implementation of Liquid for .NET. To understand how you can extend the Liquid syntax with custom filters, be sure to check out its documentation.
6. UserServiceCollectionExtensions
In our Startup class on line 50, we call an extensions called AddUserActivities. It’s time we implement that extension.
Create an Extensions folder and add the following class:
What we do here is simply register our application-specific activities, which we’ll define next.
7. CreateUser, ActivateUser and DeleteUser
Being able to write custom activities is key in workflow development. It allows you to define your domain’s terminology in the form of easy to use activities that you can drag and drop onto your workflow canvas.
For our scenario, we need 3 such activities. Let’s create a new folder called Activities and create the CreateUser activity:
Notice the use of WorkflowExpression property types. This is what allows us to work with workflow expressions. Before we can access the result of an expression, we need to evaluate it first. The WorkflowExecutionContext provides a convenient EvaluateAsync method for exactly that purpose.
Notice also the use of the ActivityProperty attributes — this is used by the Dashboard application to generate an activity editor UI.
An important feature of activities is their ability to provide output. Activity output can be accessed from other activities via expressions. In the case of the CreateUser activity, we are storing the created User object in the activity’s output.
Let’s create ActivateUser next:
When designing activities, we want them to configurable — there’s no hard-coding getting the user ID here for example — instead, we’re using expressions. This allows you to provide input to the activity from any source. In our case, we’ll be specifying an expression that fetches the created User ID from the CreateActivity. We’ll see that when we get to designing the actual workflow.
Finally, create the DeleteUser activity:
Nothing much interesting here. If the user was found & deleted, we return the Done outcome. If the user wasn’t found, we return the Not Found outcome. If we wanted to, we could connect an activity to the Not Found outcome. We won’t be doing that here, but other people using our activities might want to do so.
Now that we have our application ready, let’s launch it and start cracking on the workflow.
Creating the Workflow
Launch the application and navigate to /elsa/home. If all went well, you should see the Elsa Dashboard:

Click the Workflows menu item to the left, then hit the Create Workflow button you’ll see on the right.
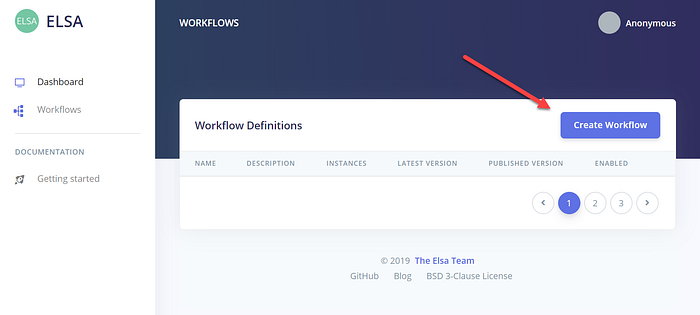
That will take you to a blank slate for us to design a new workflow on.

So, how do we start? Let’s consider what we’re trying to do:
- We want to trigger a workflow when the user submits the registration form.
- The workflow should create a User record.
- The workflow should send the user an activation link via email.
- The workflow should wait for the user to click the activation link.
- When the user clicks the activation link, we want the workflow to resume and actually activate the user.
- When the user is activated, we want to send a confirmation email.
- If the user does not click the activation link within 5 minutes, we want to delete the user.
- When the user is deleted, we will send an email to the user saying that we’re sorry to see them go.
- When 2.5 minutes have passed since sending the activation link, we want to send a reminder via email encouraging the user to activate their account by stressing them that time is running out.
Let’s start with #1.
Trigger workflow when user submits registration form
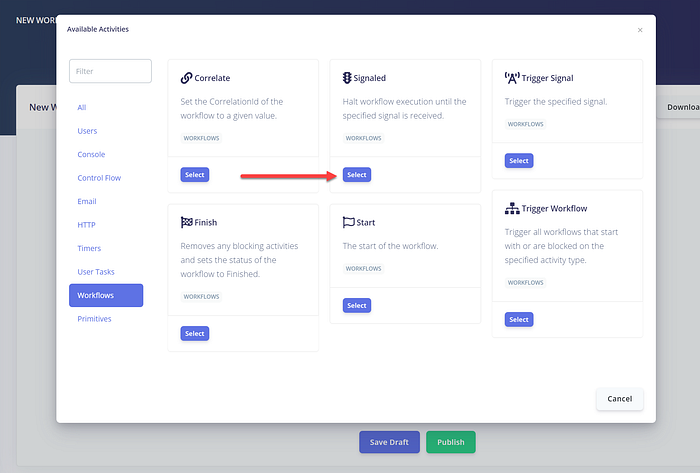
There are two activities that we could choose for this purpose:
- Receive HTTP Request
- Signaled
The Receive HTTP Request activity makes sense, because it allows us to define a URL to which the activity will respond, and we can configure the form element in our view to simply post to that activity, and that would be that.
However, I will show you another way that demonstrates how we can trigger a workflow using IWorkflowInvoker and the Signaled activity.
The Signaled activity is a blocking activity that can be used as a workflow trigger. This means the workflow will start when this signal is triggered.
Let’s go with this. Right-click on the canvas (or click the Add Activity button) and search for the Signaled activity and select it.
When the activity appears on the canvas, double-click it (or right-click, then click Edit) to edit the Signaled activity’s properties. Enter the following values:
- Signal:
RegisterUser(use “Literal” syntax) - Name: <blank>
- Title:
Register User - Description:
Trigger the workflow when this signal is received.
Remember the value for the Signal property — it’s this value that we will use when triggering the workflow using IWorkflowInvoker.
Let’s add that code right now. Save your workflow as a draft, then open Index.razor, and update the HandleFormSubmission method with the following implementation:
...
@using Elsa.Activities.Workflows.Extensions
@using Elsa.Models
@inject IWorkflowInvoker WorkflowInvoker...private async Task HandleFormSubmission()
{
    var input = new Variables();
    input.SetVariable("RegistrationModel", registrationModel);

    await WorkflowInvoker.TriggerSignalAsync("RegisterUser", input);
    ShowConfirmation = true;
}
Notice that I also added 3 lines at the top of the file (but after the “@page “/”” directive).
We injected IWorkflowInvoker into a property called WorkflowInvoker, and invoke its TriggerSignalAsync (extension) method, passing in the name of the signal we want to trigger. We also pass as an input value the registrationModel, which will contain the submitted form values thanks to Blazor’s binding mechanism.
Keep this workflow input in mind, because we will use it next when we add the second activity to the workflow.
Create User
Go back to the workflow editor and this time add the Create User activity we created earlier.
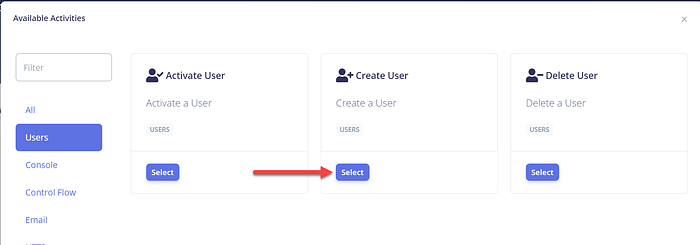
When added to the canvas, double-click this activity to open the activity editor again. This time, we will enter all the values necessary to create a user. And that’s where things get really interesting.
Obviously, we don’t want to hard-code a bunch of values here. On the contrary, we want to use the values that were submitted through the form that initiates this workflow. So how do we get those values?
Enter Workflow Expressions.
As stated earlier, Elsa supports workflow expressions, and several syntaxes at that.
Let’s see how that works.
Since we trigger this workflow while providing Input variables, we can use the following Liquid expression to access such variables:
{{ Input.SomeVariableName }}Since we invoke the workflow with an input variable called RegistrationModel, we will be able to access it using the following expression:
{{ Input.RegistrationModel }}Sweet! However, there’s a small caveat: Fluid, the library providing us with this Liquid goodness, implements a white-listing strategy, which means that nothing is accessible by default. To make things accessible, such as our RegistrationModel, we need to tell Fluid so.
To configure Liquid with access to certain types, we need to whitelist these types. We do this by implementing a notification handler for the EvaluatingLiquidExpression message, which Elsa publishes when it’s about to evaluate a Liquid expression.
That’s where the LiquidConfigurationHandler class comes into play we defined earlier.
Since the RegistrationModel variable is of type RegistrationModel, we can now access all of its properties from Liquid expressions.
Enter the following values for the Create User activity:
- User Name:
{{ Input.RegistrationModel.Name }} - Email:
{{ Input.RegistrationModel.Email }} - Password:
{{ Input.RegistrationModel.Password }} - Name:
CreateUser
Make sure to set the syntax for each field (where applicable) to Liquid.
Notice that we also filled out the Name field. Each activity has an optional Name field that we can configure with a name of our own choosing. Doing so allows us to reference this activity by name from workflow expressions.
This ability is key, because it allows us to access the user object that will be created by the Create User activity.
We’ll see how to do this next.
Send Activation Link via Email
Now that the user is created, we need to send them an email with an activation link. Once the email is sent, we want the workflow to pause and wait for the user to click the activation link, after which the workflow should resume and actually activate the user. How to make it work?
As it turns out, it’s quite easy:
- We generate a URL that will trigger the workflow using a signal name of our choosing. Let’s call this signal
“Activate”. - We add another Signaled activity to the workflow that will cause the workflow to be suspended until its configured signal name is triggered (which will happen when the generated URL is invoked)
OK. But how do we generate that URL, you wonder. Well, let’s have a look.
Add a Send Email activity and configure its properties with the following values:
- From:
noreply@acme.com - To:
{{ Activities.CreateUser.User.Email }} - Subject:
Activate your account! - Body:
<p>Welcome, {{ Activities.CreateUser.User.Name }}!</p>
<p>Please <a href=”{{ ‘Activate’ | signal_url }}”>activate your account </a> within the next 5 minutes.</p>- Name: <blank>
- Title:
Send Activation Link Email - Description:
Send an email containing an activation link.
Again, make sure to select the Liquid syntax for those fields where you entered Liquid expressions.
Let’s have a closer look at the Body field’s contents, specifically the value of the href attribute of the activation link:
href=”{{ ‘Activate’ | signal_url }}”
What we see here is a Liquid expression where we simply render the “Activate” string and then apply the signal_url Liquid filter. This filter will take the “Activate” string as an input and generate an absolute URL that will trigger the workflow with the specified signal name.
In case you are wondering how this will work when multiple workflow instances are executing, here’s how: when a workflow starts, what really happens is that a workflow instance is created from the workflow definition (the workflow we are designing). The generated signal URL contains an encrypted query string value carrying the signal name as well as the workflow instance ID. That’s how the HTTP middleware handling the incoming URL knows which workflow instance to resume.
Now that we have sent the email containing an activation link, we need to wait for the user to click on it.
But we don’t want to wait indefinitely. As per the acceptance criteria, we will allow the user 5 minutes within which they must activate their account before we delete it.
If you are thinking: “sounds like we need to fork this thing”, you are correct: fork is right.
Fork
Open the Activity Picker, look for the Fork activity and add it to the workflow. Then double-click the activity and enter the following values for each field:
- Branches:
Activate, Timeout - Name: <blank>
- Title: <blank>
- Description:
Split execution
And click Save.
Notice that the Fork activity has two outcomes: Activate and Timeout, both of which we defined in the Branches field of the activity.
The Fork activity allows us to specify any number of branches using any name we like, separated by a comma. When the Fork activity executes, it will split workflow execution into all of the specified branches, and all of these branches will be executed.
I would say “executed in parallel”, but in reality the workflow invoker executes each branch one after the other; however this is an implementation detail, and might change and actually execute the branches in parallel in the future. From a logical point of view, you can consider each branch to execute in parallel.
Let’s implement the Activate branch first. When we’re done with that, we will circle back and implement the Timeout branch.
Activate Branch: Activation Link Clicked
Add a new activity of type Signaled and provide it with the following values:
- Signal:
Activate - Name: <blank>
- Title:
Activation Link Clicked - Description:
Wait for user to click the activation link.
Notice that the signal name is the exact same value as the name we used when generating the signal URL.
With this activity in place, workflow execution will simply halt and be resumed once it receives the Activate signal.
Make sure to connect the Fork activity to this activity (using the Activate outcome).
Activate Branch: Activate User
When the workflow does receive the Activate signal, we want to activate the user. This is where our Activate User activity comes into play. Open the activity picker, look for the Activate User activity, and add it to the workflow.
Provide the activity with the following values:
- User ID:
{{ Activities.CreateUser.User.Id }} - Name: <blank>
- Title: <blank>
- Description:
Activate the created user.
Notice that we again rely on a Liquid expression to access the output of another activity in the workflow (the named CreateUser activity in this case).
When this activity executes, it will simply switch the IsActivate property of the created user to true and store that change.
Now that the user is activated, let’s send them an email to let them know.
Activate Branch: Send Activation Confirmation Email
Add another Send Email activity and provide the following values:
- From:
noreply@acme.com - To:
{{ Activities.CreateUser.User.Email }} - Subject:
Thanks for activating! - Body:
<p>Hi {{ Activities.CreateUser.User.Name }},</p>
<p>Thanks for activating your account!</p>- Name: <blank>
- Title:
Send Activation Confirmation Email - Description:
Send an email confirming that the account has been activated.
Nothing we haven’t seen already.
We’re almost done with this branch. All that’s left is to display a message in the browser window. Remember: the user will have clicked the activation link, taking them to a new browser tab or window, which will invoke the workflow. By default, the HTTP middleware will simply reply with an HTTP Accepted status code. But all the user will see is a blank page, which will confuse the user (“did it work?”). Instead, we should either redirect the user to another page stating that their account has been successfully activated, or at the very least render a message to that effect. I will keep it simple here, so let’s go with the latter and add the Write HTTP Response activity.
Activate Branch: Display Activation Confirmation Page
Open the activity picker, look for the Write HTTP Response activity, and provide the following values:
- Status Code:
200 - Content:
<p>Hi {{ Activities.CreateUser.User.Name }},</p>
<p>Thanks for activating your account!</p>- Content Type:
text/html - Response Headers: <blank>
- Name: <blank>
- Title:
Display Activation Confirmation Page - Description:
Display a page confirming that the account has been activated.
That’s it for the Activate branch! Let’s circle back to the Fork activity, and implement the Timeout branch.
Timeout Branch: Wait for 2.5 minutes
The purpose of the Timeout branch is to delete the user account if said user does not activate said account within 5 minutes. We also want to send a reminder after 2.5 minutes that time is running out.
That’s what we will do first: after 2.5 minutes, send a reminder email.
Open the activity picker and look for the Timer Event activity and provide it with the following values:
- Timeout Expression:
00:02:30 - Name: <blank>
- Title:
Wait for 2.5 minutes - Description: <blank>
Timeout Branch: Send Reminder Email
Add a Send Email activity with the following values:
- From:
noreply@acme.com - To:
{{ Activities.CreateUser.User.Email }} - Subject:
Don’t forget to activate your account! - Body:
<p>Hi {{ Activities.CreateUser.User.Name }}!</p>
<p>Please don’t forget to <a href=”{{ ‘Activate’ | signal_url }}”>activate your account </a> within the next 2 minutes.</p>- Name: <blank>
- Title:
Send Reminder Email - Description:
Send a reminder email that the user’s time is running out!
Nothing we haven’t seen before either. Do notice that we are generating a new activation URL. However, it doesn’t matter whether the user clicks the original one, or the one from the reminder email; both URLS carry the proper signal name (“Activate”) and workflow instance ID.
Tip: If for whatever reason you prefer to use the exact same URL in both emails, you could add a Set Variable activity, and use the
signal_urlLiquid filter there. The generated URL will now be stored in a workflow variable, which you can reference from both Send Email activities.
Timeout Branch: Wait for 2.5 minutes
After sending the email, the workflow must wait for another 2.5 minutes before calling it a night. Add another Timer Event with the exact same values used for the other Timer Event.
Timeout Branch: Delete User
Time’s up, and we are left with no choice but to delete the user. Add the Delete User activity and provide it with the following values:
- User ID:
{{ Activities.CreateUser.User.Id }} - Name: <blank>
- Title: <blank>
- Description:
Delete the created user.
Timeout Branch: Send Account Deleted Email
After the user has been deleted, we will let them know about this sad news by sending them a final email.
Add a new Send Email activity with the following values:
- From:
noreply@acme.com - To:
{{ Activities.CreateUser.User.Email }} - Subject:
Sorry to see you go - Body:
<p>Hi {{ Activities.CreateUser.User.Name }},</p>
<p>We’re sorry to see you go. We look forward to having you again!</p>- Name: <blank>
- Title:
Send Account Deleted Email - Description:
Send the user an email confirming that their account has been deleted.
Finish
Way to go! Since you’ve made it this far, let’s go the extra mile and finish up the workflow. By default, a workflow will automatically finish when there are no more blocking activities to resume. But in our workflow, there are two branches of execution: Activate and Timeout. If the user activates their account within 5 minutes, their account will be activated and that’s fine.
However, the workflow will still have one blocking activity: one of the two Timer Events. And they will eventually trigger! This is bad, as it will cause the user account to be deleted.
There are a number of ways we can mitigate this:
- Add a Join activity that merges the two branches back into a single path of execution.
- Add two IfElse activities in the Timout branch to check if the user has already been activated. When true, don’t send reminders and don’t delete the user.
- Add a Finish activity that removes any and all blocking activities.
We will go with option #3 because it’s the simplest of all and specifically designed to handle this sort of scenarios. So, go ahead and add the Finish activity to the workflow, and make sure to connect both branches of execution to this one.

That’s it! Make sure to Publish the workflow, and we will take it for a spin!
Taking it for a spin
Launch the application and make sure you have an SMTP host running (I’m using Smtp4Dev).
We’ll take two spins: first we test the Timeout branch, secondly we will test the Activate branch.
Timeout Branch
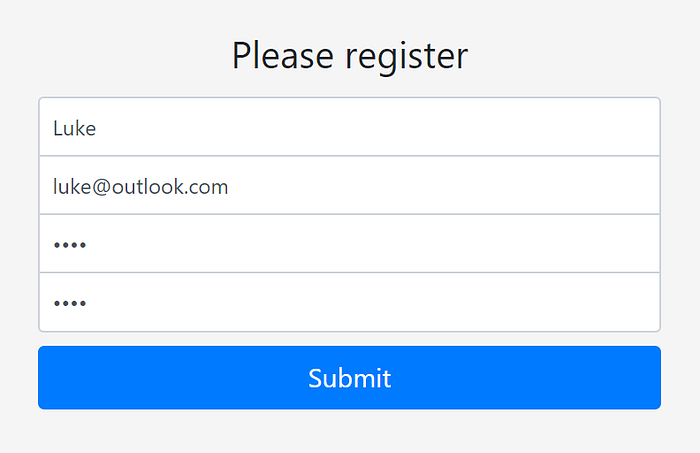
We start by filling out the registration form:
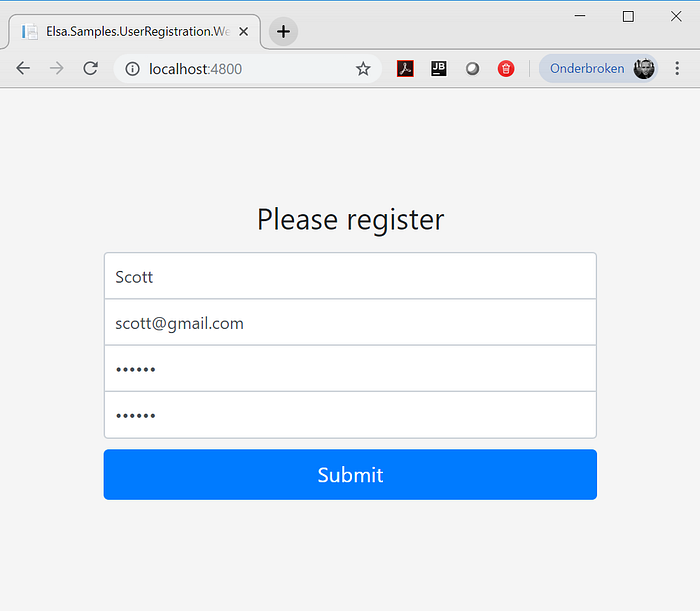
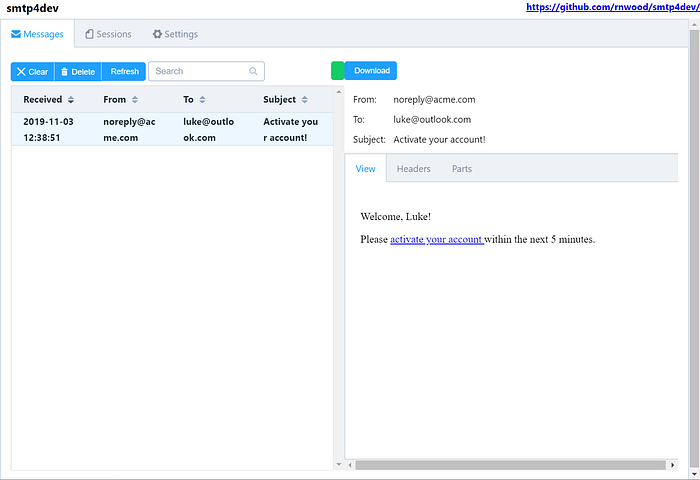
When you press Submit, you should see a confirmation message stating that you should check your email. Let’s do that:
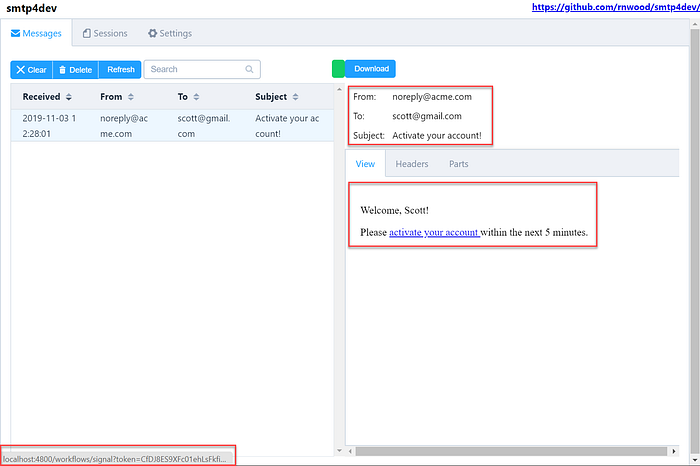
We indeed received an email, and it contains all of the information we expected!
To make sure the user was indeed created, let’s also inspect the database:
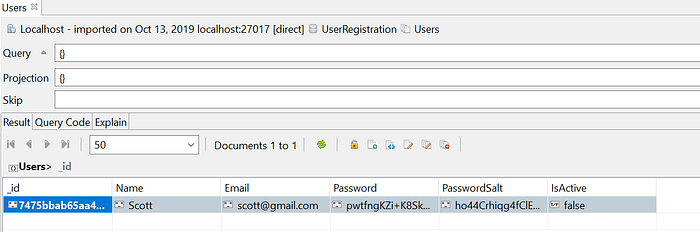
The user is indeed there.
After about 2.5 minutes, we should receive a reminder:

Yep, that’s in the affirmative.
And after about another 2.5 minutes, we should receive a termination message:
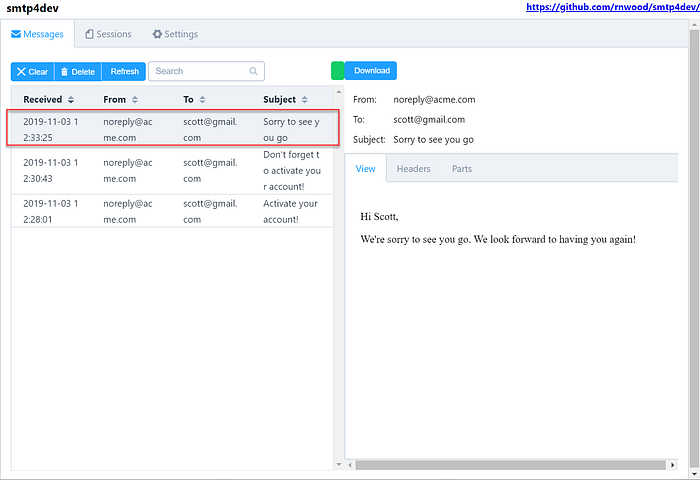
Check.
Inspecting the database should display zero users:

That all worked out as expected!
Now let’s test the Activate branch.
Activate Branch
Refresh the registration form and fill it out with another set of details. For example:
Hit Submit and wait for the Activation Link email to arrive:
This time, we click the activation link:
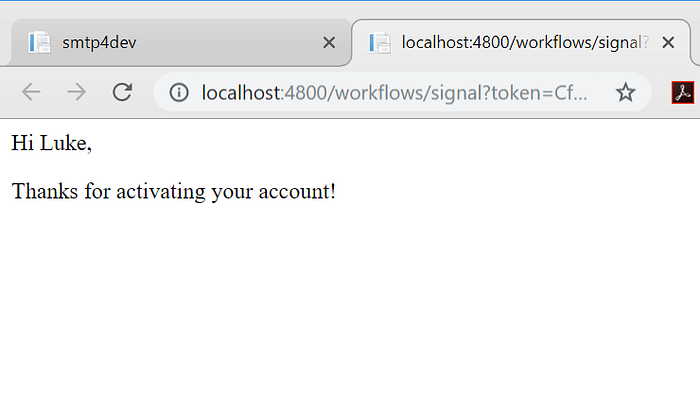
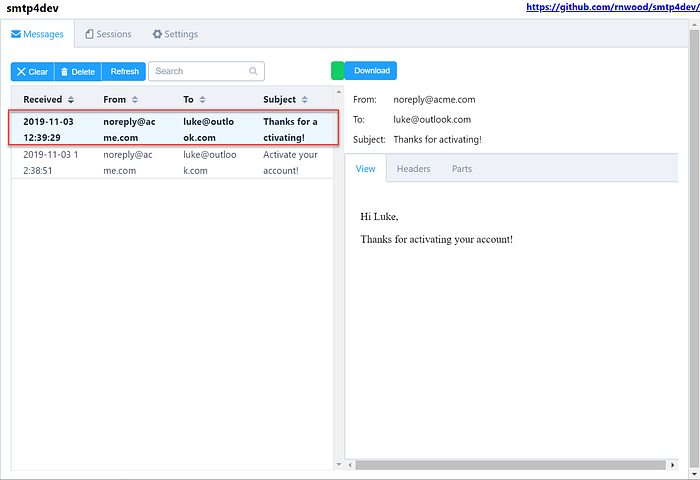
We also receive an email with a confirmation:
Now that we have executed the workflow two times, let’s have a look at the created workflow instances from the Dashboard.
Inspecting Workflows
Everytime a new workflow starts, a workflow instance is created. A workflow instance maintains the state of the workflow, which amongst other things includes which activities are blocking, what input was provided, and what output is stored by the activities.
It also stores a journal of executed activities, which allows us to visually trace the workflow execution path.
Let’s see how that works.
Navigate to the Elsa Dashboard and click the Workflows menu item.

Notice that the workflow has 2 finished instances. Clicking that link takes us to a list of these finished instances:
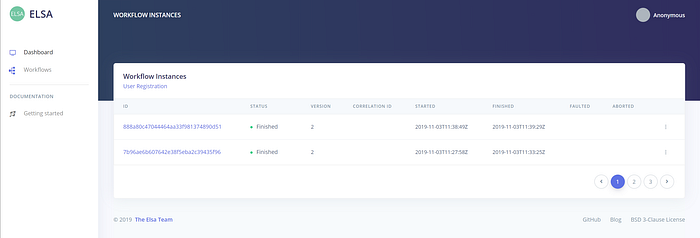
The workflow instances are displayed in order of execution, where the last execution is displayed first.
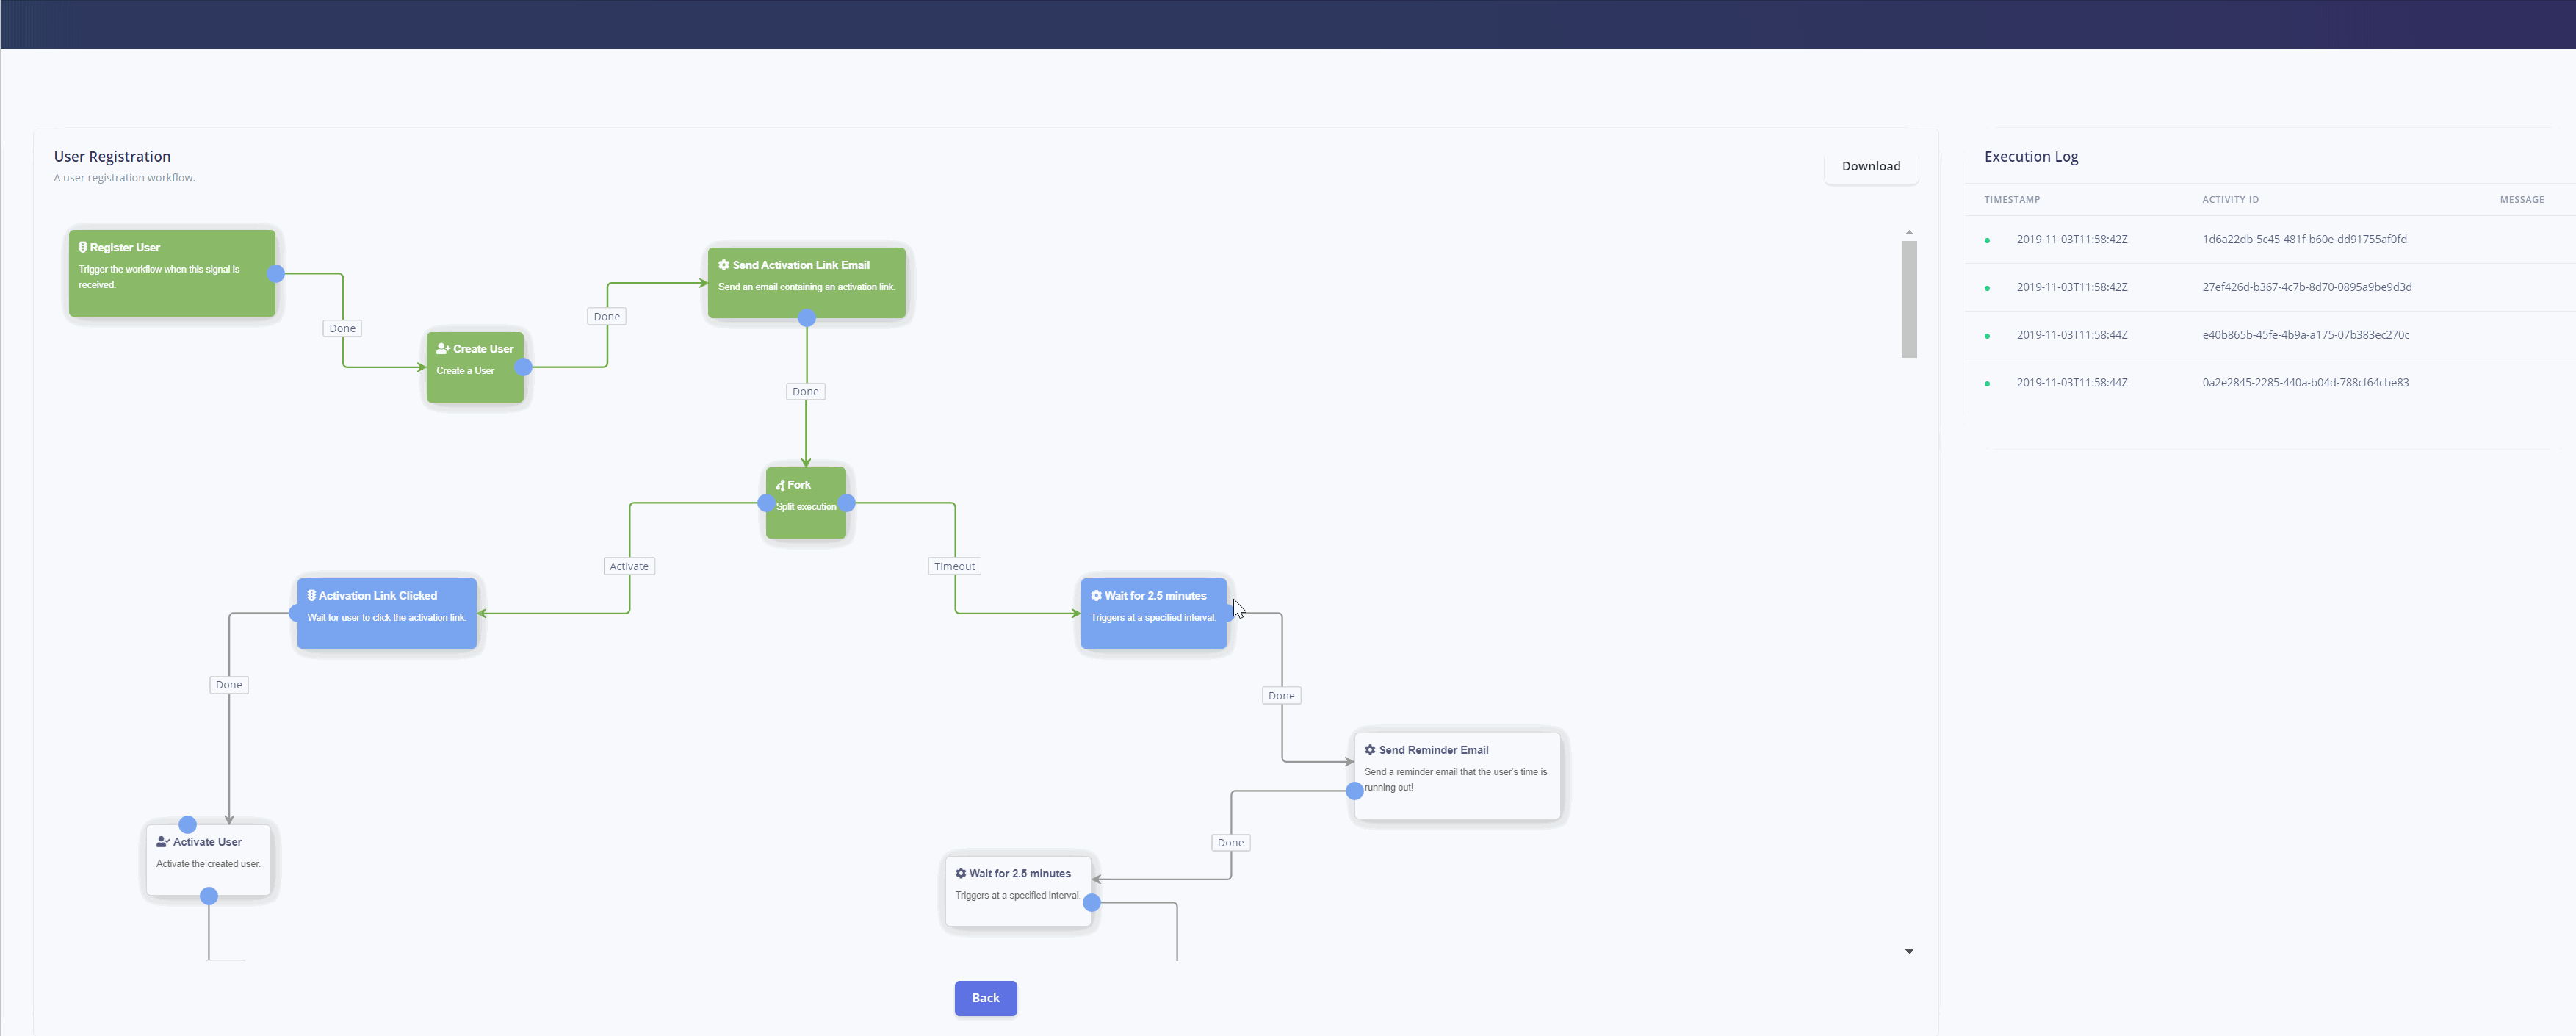
Clicking the ID of the last instance (the one that executed first) will take us to its workflow instance details page:

The green-colored activities represent activities that have executed. Blue-colored activities represent blocking activities, while grey-colored activities represent activities that have not executed. If you ever see a red-colored activity, it means that activity has faulted, causing the entire workflow to fault as well.
To the right we see the Execution Log.
As you hover over each execution log entry, the corresponding activity on the canvas will highlight. This way you can visually see in what order the workflow executed its activities. It’s easy to imagine having a “replay” button doing this automatically, which is one of a few ideas I have to improve the UI.
Here’s an animated gif of a workflow instance that is in the Halted state (blocked on one of the Timer Event activities as well as one of the Signaled activities):
Conclusion
Workflows are a powerful tool for implementing long-running process. Elsa aims to make this easy by providing an easy-to-use set of APIs and tools to design and execute workflows.
In this post, we have taken a look at some of the steps a developer would typically take in order to enable workflow capabilities in an ASP.NET Core application.
Although we combined the Dashboard with workflow execution into the same application, this is not mandatory. It’s just as easy to create two separate applications, where one represents the dashboard, while the other represents your real-world application that executes the workflows designed with the Dashboard.
For more information, please checkout https://elsa-workflows.github.io/elsa-core/.
The completed application for this blog post can be found here: https://github.com/elsa-workflows/elsa-samples/tree/master/src/Elsa.Samples.UserRegistration
The workflow definition JSON file can be found here: https://github.com/elsa-workflows/elsa-samples/blob/master/src/Elsa.Samples.UserRegistration/user-registration-workflow.json